As you all know there are advantages of going to 15 inch wheels on the early 60's Lincolns, namely to be able to buy affordable tires that fit and carry the load of these big cars, therefore saving a bunch of money over the $200 Coker tires. I saved over $400 on my set of 5 (including the cost of new wheels and conversion materials)
One of the disadvantages is that many times you have to change to later model year's hubcaps which are 15", thus sacrificing originality for practicality. Below you will see how to convert a 14" wheel cover to fit a 15" wheel (My car is a 1963, but would work with any 14 inch outside gripper style hubcap). Some people have said that they just bend the tabs, but I only mutilated my hubcap trying to make it fit, and if you are successful, (I gave up) you will have a section of the painted wheel showing all around the hubcap, not making it a full wheel cover, also making you go for an imperfect wheel balance by hiding the wheel weights in the back (this method hides them). If you change to a later model hubcap, you will also have to deal with the special Cadillac type wheel weights- this method will also allow standard wheel weights.
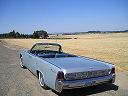
What you will end up with is this:
(click to enlarge)

As you will see, you really have to stare at the photo to notice the addition of a trim ring around the outside diameter, therefore making it a full wheel cover.
I purchased a set of used trim rings of a Chevy Astro van (cost me $30 for 4)- these GM type trim rings are very common and were used for many years on GM rally type wheels. I have even seen these sold new at Chevrolet reproduction specialty shops (used on old Camaros). They consist of a double layer construction, with the outside being polished stainless steel-flat on the edges, and the inner layer, regular galvanized steel where the grippers are mounted. These grippers according to the tire store I bought them from they hold very well since they are made of spring steel and not just bent tabs on a hubcap. You will notice when you try to get them off your car. The gripper location will change the way your hubcap grips the wheel, it will now work like a regular hubcap, but is held on with spring loaded grippers that are a part of the new trim ring.
(click to enlarge)

Here is what they look like:
(click to enlarge)

After measuring 5/8" inches in from the outside circumference, mark the ring with a permanent marker. If you make a mistake, just remove it with some fine steel wool, and remark.
Like this:
(click to enlarge)

You then get an air cut off tool (I bought a cheap one at Harbor Freight for about $12 and it worked great) and cut out the majority of the stainless side of the trim ring. Reminder...The sparks will fly so move your gas can out of the garage. You could also use a dremel tool with a cutoff head:
(click to enlarge)

THIS 5/8" IS CRITICAL, SINCE IT HAS TO BE LARGE ENOUGH FOR THE HUBCAP TO FIT IN, YET 1/2" OF THE OUTSIDE TRIM RING WILL SHOW, WHEN IN DOUBT, LEAVE A LITTLE ROOM AND YOU CAN HIT IT AGAIN WITH THE CUT OFF WHEEL TO STOP AT THE 5/8" MARK.
After new inner stainless ring is removed and discarded, I hit the outside edge of the remaining trim ring with the buffing wheel, and some polish before assembly.
(click to enlarge)

For an added measure of safety, and to prevent rattling, I bent a couple of gripper tabs straight, that I will then later pop rivet to the trim ring.
(click to enlarge)

When inserting the hubcap, I used some needle nose pliers and bent in the tabs and supporting ring on the hubcap since it is a very tight fit. Before you insert the hubcap, make sure that your hole is big enough in the trim ring to accept it because once you press the hubcap in, the grippers of the hubcap will lock on the edge of the trim ring and is very difficult to remove (that is a good thing once on the road). If you have to remove the hubcap you have to use a screwdriver from the back side to release the grippers.
Insert hubcap, then pop rivet (1/8"x 5/8" rivets) the straightened out grippers (I only did 2, since the regular hubcap grippers work so well.
(click to enlarge)

I feel I am helping out the auto industry, by improving inter-racial relations with my Chevy wheels and trim rings (but I do not want to show anyone more than 1")


 One of mine was not, so I ended up buying five wheels for a total cost of $75.


