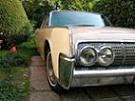
Rip Van Winkle Lincoln
-
John Mc

- Lincoln-ally Insane
- Posts: 3497
- Joined: Thu Dec 21, 2000 1:01 am
- Location: Crystal Lake, IL USA
- Contact:
Re: Rip Van Winkle Lincoln
Phil, I'm really enjoying your progress - burning the "gasoline" was amazing. Keep up your excellent saga. 
John Mc - Lake Shore Region Director
‘48 Continental Cabriolet
‘77 Town Coupe Black Diamond
‘77 Town Coupe Glass Top
'06 Mark LT
‘14 MKZ
'15 Lincoln MKC
‘48 Continental Cabriolet
‘77 Town Coupe Black Diamond
‘77 Town Coupe Glass Top
'06 Mark LT
‘14 MKZ
'15 Lincoln MKC
-
CMP-Phil

- Lincoln Maniac
- Posts: 363
- Joined: Mon Dec 03, 2012 4:44 pm
- Location: New Hampshire, USA
- Contact:
Re: Rip Van Winkle Lincoln
Hi Andy
First saw your update, fantastic.
Yes, the project is coming along well, the engine is measuring out that is will only need a stock set of bearings and rings and a couple of new valve guides everything else is measuring as matching stock. First restoration job I've done that has not need a major engine overhaul.
Body work is progressing, rocker panels were a given but it looks like I will have to fabricate all of the support structure hidden in the rocker panels on the passenger side at least.
I'm building a list of questions which I will be sending along.
The Lincoln sent me to the hospital this afternoon, was removing the carpets from the rear seat area, thought I had all the screws out but I missed one, when the carpet pulled free I got a face full of 40 years of mouse droppings, rust what ever. I cleanup best I could then when to see the eye doctor at the hospital, she spent the better part of an hour getting crud out of my eyes. How do you explain how you got mouse crap in your eyes to a lady doctor. Anyway looks like everything is OK because I'm sitting here looking at a computer screen.
Cheers Phil
Philip Waterman, New Hampshire
Cosmopolitan Town Sedan - Being restored1949 Lincoln web page
My Restoration Web Page
Cosmopolitan Town Sedan - Being restored1949 Lincoln web page
My Restoration Web Page
-
ReijerLincoln
- Lincoln-ally Insane
- Posts: 4939
- Joined: Thu Jan 06, 2005 7:15 am
- Location: The Netherlands
- Contact:
Re: Rip Van Winkle Lincoln
Phil, a belated welcome from me too. What a great project, I've been reading up on it with interest. Not to many cars of this period on the forum, so it's well worth documenting your progress. I imagine finding parts must be quite an (expensive) ordeal....
cheers,
Reijer
PS Watch out for old mouse excrement... it can cause a fatal sickness.
cheers,
Reijer
PS Watch out for old mouse excrement... it can cause a fatal sickness.
-
CMP-Phil
- Lincoln Maniac
- Posts: 363
- Joined: Mon Dec 03, 2012 4:44 pm
- Location: New Hampshire, USA
- Contact:
Re: Rip Van Winkle Lincoln - Progress Update
Hi All
In another thread John McCarthy reminded me that I had not up date my progress lately with any photos. Well there has been progress on the 49 Cosmopolitan, work just not the kind that really shows up in photos very well.
When I started on the project I thought it was going to be a mostly mechanical project with limited body work around the rear fender openings, but what I discovered was that the rust was more extensive (how many times have you heard that) in that the rocker panels along with all the structure behind and inside was in reality nothing but rust held together by collective memory. The good news is it looks like the engine is going to go back together with little or no machine shop work. All the bearing and the piston bores are measuring up as still within the stock measurements as is the cam and crank.
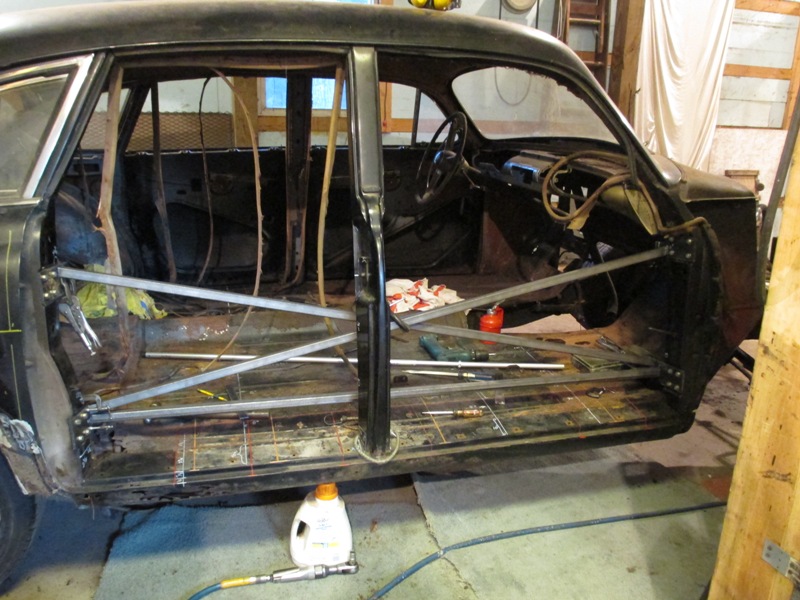
But John's comment was very appropriate as today I made a trip to the steel supplier to pick up a load of steel for the next step of the process. Picking up a 4x8 sheet of sheet metal but most important three 12' lengths of 1x1 box tubing. The tubing is so that I can X brace the door openings and across the body to hold everything in position as cut out the rust and restructure the entire area. All of the doors on the car still close with that nice solid thunk sound and are all still in alignment so I wanted make sure everything is held in position for the next part. (The trip to get the steel was delayed until good weather as I went to get it in one of my antique trucks. Good excuse to spend the day driving an antique.)
As the sheet metal really doesn't look bad until you look in side photos don't really show much yet. Just lots of documentation shots measuring back to solid material.
Other work has included stripping out the wiring harness and installing it on a pin board preparing to replicate it. What you see in the photo below is just the dash and engine compartment harness.
I've also been cleaning parts, I recently purchased an Eastwood Soda Blasting unit for stripping paint off without damaging steel. In the past I've used heavy duty blasting units stripping frames on the trucks but didn't like the potential for damage to light gauge sheet metal. After some initial frustration in getting the unit to work consistently I now think it will be a good addition to the shop. Next is a blasting box big enough to hold large parts with a really good dust collection system.
More to come.
Cheers Phil
In another thread John McCarthy reminded me that I had not up date my progress lately with any photos. Well there has been progress on the 49 Cosmopolitan, work just not the kind that really shows up in photos very well.
When I started on the project I thought it was going to be a mostly mechanical project with limited body work around the rear fender openings, but what I discovered was that the rust was more extensive (how many times have you heard that) in that the rocker panels along with all the structure behind and inside was in reality nothing but rust held together by collective memory. The good news is it looks like the engine is going to go back together with little or no machine shop work. All the bearing and the piston bores are measuring up as still within the stock measurements as is the cam and crank.
But John's comment was very appropriate as today I made a trip to the steel supplier to pick up a load of steel for the next step of the process. Picking up a 4x8 sheet of sheet metal but most important three 12' lengths of 1x1 box tubing. The tubing is so that I can X brace the door openings and across the body to hold everything in position as cut out the rust and restructure the entire area. All of the doors on the car still close with that nice solid thunk sound and are all still in alignment so I wanted make sure everything is held in position for the next part. (The trip to get the steel was delayed until good weather as I went to get it in one of my antique trucks. Good excuse to spend the day driving an antique.)
As the sheet metal really doesn't look bad until you look in side photos don't really show much yet. Just lots of documentation shots measuring back to solid material.
More to come.
Cheers Phil
Philip Waterman, New Hampshire
Cosmopolitan Town Sedan - Being restored1949 Lincoln web page
My Restoration Web Page
Cosmopolitan Town Sedan - Being restored1949 Lincoln web page
My Restoration Web Page
-
ANDY FENTON

- Occasional Visitor
- Posts: 39
- Joined: Mon Jan 25, 2010 10:51 am
- Location: camden ny
- Contact:
Re: Rip Van Winkle Lincoln
Phil, havent spoke in a while. but you are really coming along with the project.. i see that you are having fun with the wiring harness. i just quit and ordered a brandy new one from rhode island wire. they have the town sedan in thier files. the harness was awesome. snapped right in and the lenghts, colors, bullet ends were very authentic.been having a ball bombing around in mine. when that overdrive kicks in what a cruiser, likes to be around 70-75 mph. getting a lot of " whats that". jim ayres wants me to drive it to peeble beech concours this year for the "lincoln show" and film the trip for you tube. so you better hurry up if we are going to have a "convoy" !!!!! hahah send up some more pics when you can. good luck! oh by the way, the mouse turd story brought back some memories.. i found a very flat dead cat!!!!!!
cheers!
andy fenton
cheers!
andy fenton
- Attachments
-
-
CMP-Phil
- Lincoln Maniac
- Posts: 363
- Joined: Mon Dec 03, 2012 4:44 pm
- Location: New Hampshire, USA
- Contact:
Re: Rip Van Winkle Lincoln - Still Progressing
Hi All
John Mc and a couple other people have reminded me that I have not given a progress report lately.
Well progress has been slow but the project is Still Progressing. In hommage Robert Frost's poem Fire and Ice which begins "Some say the world will end in fire, Some say in ice." one might add "Old Lincolns will end in rust" or at least that's the major problem I'm seeing. So what do you do when you discover that what looks like rocker panel structure and Hat Channel body supports is in reality a casting of undercoat and rust.

Took me awhile to figure out how to tackle the problem, once I had the structure figured out I tried forming the sections on the metal brake in my shop but could not get consistent enough results in 18 gauge steel, yes the original unrusted section measured 18 gauge, I took the drawings to a sheetmetal shop for $350 they bent up enough channels to do two cars.
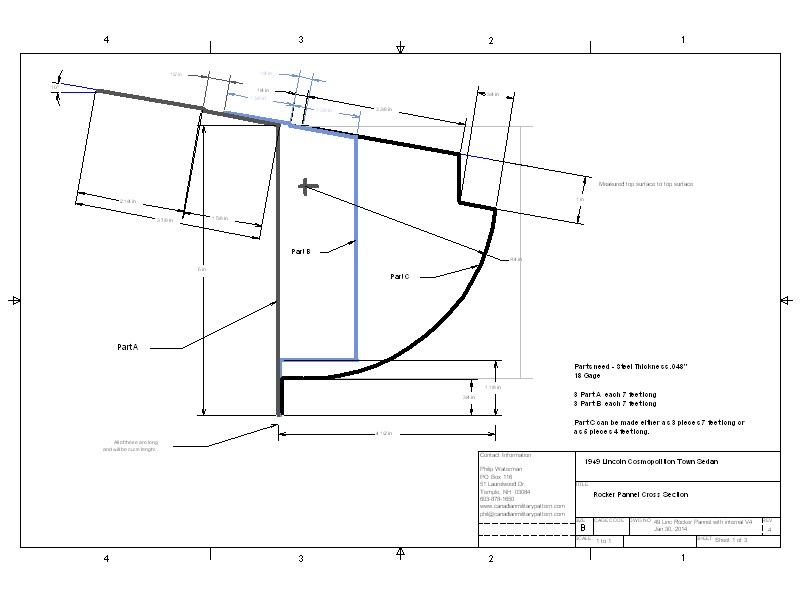
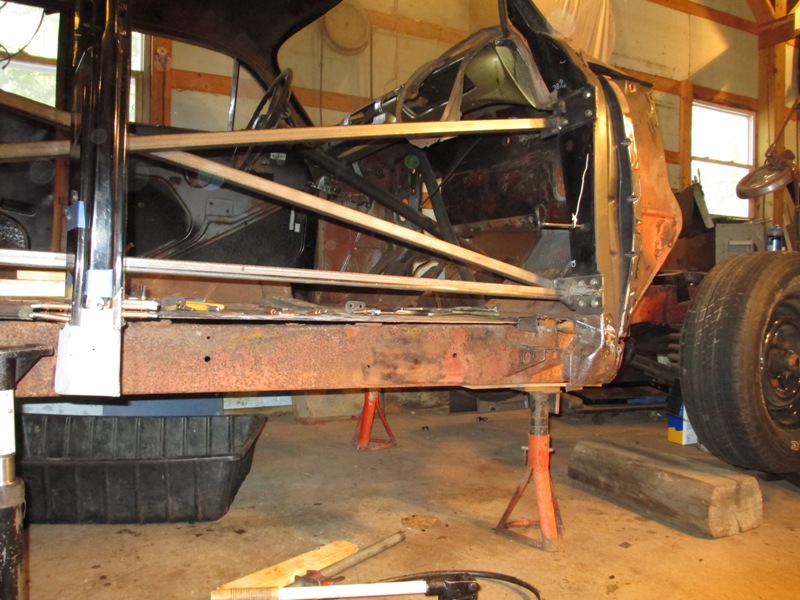
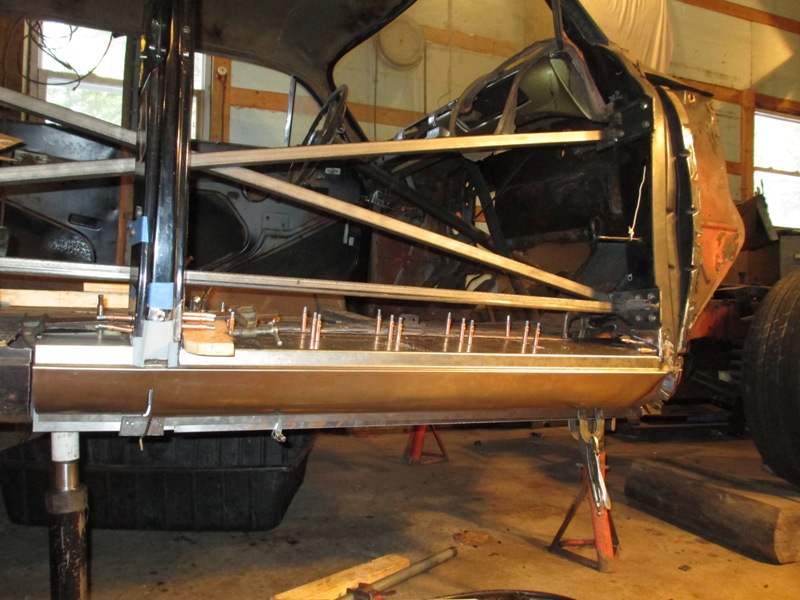
Then the real issue was figuring out how to get the new panels to go in precisely and to hold the body ridged while the old rocker panels are cut out and replaced. First step was to X brace the side of the car to make sure nothing moved.
I have taken all sorts of measurements, templates and overlays so that I can get the car back to the original body lines and fit. But I was still concerned about an accurate way of locating the rocker panels where they mate with the doors. In the end I came up with a gauge poll that is easy to slip on and off the car to check alignment of the panels.
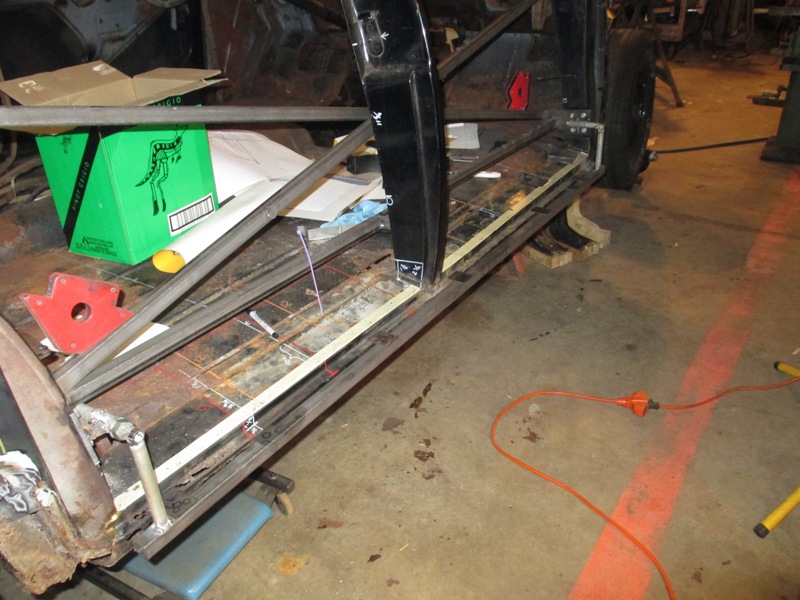
Instead of cutting out the entire length of the car I decided to do it a section at a time, right now I've replace the right front door section. It is amazing how much strength there is in left in even lacy rust so I didn't want a lot of things floating.
I will fill in the progress and my method in coming posts here and will be expanding my website with a lot more photos and narrative. I was sort of holding off posting more on the project until I knew that my approach was going to work, and now as new steel starts to go back in and get tied together it looks like it will work.
I've put a lot more info and photos up on my web page
Page 1 Deals with history of car
Page 2 X bracing and Hat Channel Supports
Panel Alignment pole and cutting away the rust sections and welding in new structure
Cheers Phil
PS will someone remind me how to link a text description to a URL without showing URL?
John Mc and a couple other people have reminded me that I have not given a progress report lately.
Well progress has been slow but the project is Still Progressing. In hommage Robert Frost's poem Fire and Ice which begins "Some say the world will end in fire, Some say in ice." one might add "Old Lincolns will end in rust" or at least that's the major problem I'm seeing. So what do you do when you discover that what looks like rocker panel structure and Hat Channel body supports is in reality a casting of undercoat and rust.
Took me awhile to figure out how to tackle the problem, once I had the structure figured out I tried forming the sections on the metal brake in my shop but could not get consistent enough results in 18 gauge steel, yes the original unrusted section measured 18 gauge, I took the drawings to a sheetmetal shop for $350 they bent up enough channels to do two cars.
Then the real issue was figuring out how to get the new panels to go in precisely and to hold the body ridged while the old rocker panels are cut out and replaced. First step was to X brace the side of the car to make sure nothing moved.
I have taken all sorts of measurements, templates and overlays so that I can get the car back to the original body lines and fit. But I was still concerned about an accurate way of locating the rocker panels where they mate with the doors. In the end I came up with a gauge poll that is easy to slip on and off the car to check alignment of the panels.
Instead of cutting out the entire length of the car I decided to do it a section at a time, right now I've replace the right front door section. It is amazing how much strength there is in left in even lacy rust so I didn't want a lot of things floating.
I will fill in the progress and my method in coming posts here and will be expanding my website with a lot more photos and narrative. I was sort of holding off posting more on the project until I knew that my approach was going to work, and now as new steel starts to go back in and get tied together it looks like it will work.
I've put a lot more info and photos up on my web page
Page 1 Deals with history of car
Page 2 X bracing and Hat Channel Supports
Panel Alignment pole and cutting away the rust sections and welding in new structure
Cheers Phil
PS will someone remind me how to link a text description to a URL without showing URL?
Last edited by CMP-Phil on Tue Mar 25, 2014 6:01 pm, edited 1 time in total.
Philip Waterman, New Hampshire
Cosmopolitan Town Sedan - Being restored1949 Lincoln web page
My Restoration Web Page
Cosmopolitan Town Sedan - Being restored1949 Lincoln web page
My Restoration Web Page
-
John Mc
- Lincoln-ally Insane
- Posts: 3497
- Joined: Thu Dec 21, 2000 1:01 am
- Location: Crystal Lake, IL USA
- Contact:
Re: Rip Van Winkle Lincoln
Phil,
Thanks for the update, just amazing! I'm happy to tackle the little projects around these old cars. Major projects like you have there and doing all on your own just blows mw away. Wish you were closer, like to see the progress personally.
Thanks for the update, just amazing! I'm happy to tackle the little projects around these old cars. Major projects like you have there and doing all on your own just blows mw away. Wish you were closer, like to see the progress personally.
John Mc - Lake Shore Region Director
‘48 Continental Cabriolet
‘77 Town Coupe Black Diamond
‘77 Town Coupe Glass Top
'06 Mark LT
‘14 MKZ
'15 Lincoln MKC
‘48 Continental Cabriolet
‘77 Town Coupe Black Diamond
‘77 Town Coupe Glass Top
'06 Mark LT
‘14 MKZ
'15 Lincoln MKC
-
continentalguy

- Addicted to Lincolns
- Posts: 1601
- Joined: Wed Oct 25, 2006 7:29 pm
- Location: Bloomington, IN
- Contact:
Re: Rip Van Winkle Lincoln - Still Progressing
Phil,CMP-Phil wrote: I've put a lot more info and photos up on my web page
Page 1 Deals with history of car http://canadianmilitarypattern.com/Rip% ... incoln.htm
Page 2 X bracing and Hat Channel Supports http://canadianmilitarypattern.com/Rip% ... ge%202.htm
Page 3 Panel Alignment pole and cutting away the rust sections http://canadianmilitarypattern.com/Rip% ... ge%203.htm
Cheers Phil
PS will someone remind me how to link a text description to a URL without showing URL?
If you want your URLs to show up as text do the following:
TEXT
Page 1 Deals with history of car
Page 2 X bracing and Hat Channel Supports
Page 3 Panel Alignment pole and cutting away the rust sections
P.S. Wonderful work so far! Keep it coming.
-Allan
'54 Lincoln Capri Sport Coupe, '56 Continental Mark II, '61 Lincoln Continental Convertible,
'62 Lincoln Continental Sedan, '70 Lincoln Mark III, '72 Lincoln Mark IV, '17 Lincoln MKC
'54 Lincoln Capri Sport Coupe, '56 Continental Mark II, '61 Lincoln Continental Convertible,
'62 Lincoln Continental Sedan, '70 Lincoln Mark III, '72 Lincoln Mark IV, '17 Lincoln MKC
-
CMP-Phil
- Lincoln Maniac
- Posts: 363
- Joined: Mon Dec 03, 2012 4:44 pm
- Location: New Hampshire, USA
- Contact:
Re: Rip Van Winkle Lincoln
Hi John and Allen
Thanks Allen for showing me how to link words to a URL, looks much better the way you suggest.
John- one of the great things about a website forum like this is that you get to meet people from all over, and yes there are times that you would really like to go visit a project. Strangely every now and then the chance actually does come up, so if you are ever in New England give me a shout. On my other antique vehicles I've actually had people stop in when they were visiting in the states from Australia, and the West Cost of the US.
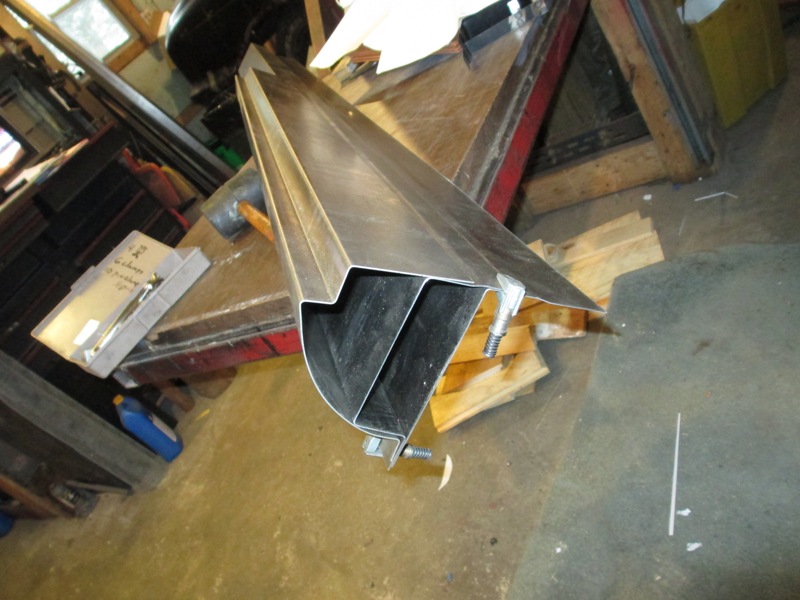
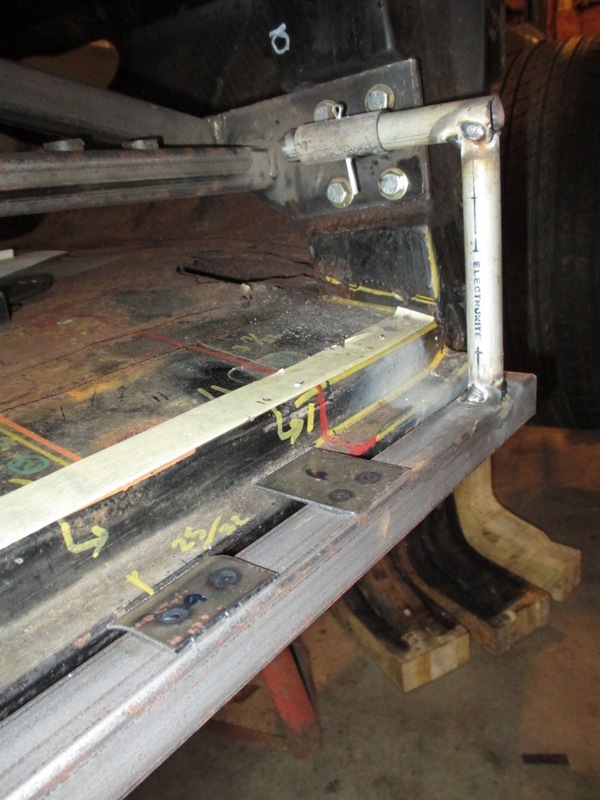
On to progress yesterday and today I actually started welding in the panels and supports, up until now it has been a lot fitting and lots of Cleco Pins and Clamps. Today I welded in the middle body support which ties the center door post back into the cars floor pan and has the mounting bolt to bolt the body through rubber donuts to the frame. Once the body mount end was but welded to the Hat Channel under the floor a couple of zaps with the pinch spot welder and it was tied to the inner panel of the rocker structure.
Here are the three layers of the assembly going in with Cleco Pins.
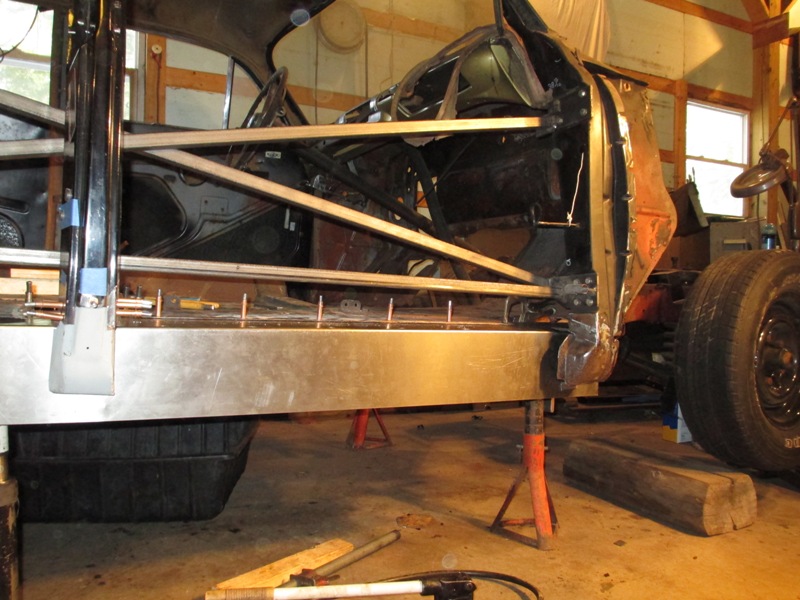
The last picture is of course putting alignment jig in place again to check positioning for the next round of welding in the morning.
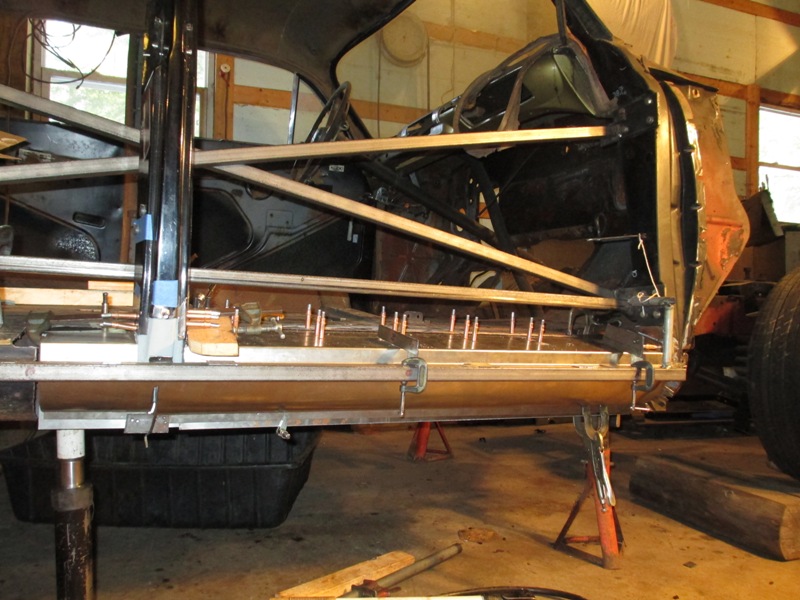
Now that I've got the process worked out I think the speed of progress will pick up.
Cheers Phil
Thanks Allen for showing me how to link words to a URL, looks much better the way you suggest.
John- one of the great things about a website forum like this is that you get to meet people from all over, and yes there are times that you would really like to go visit a project. Strangely every now and then the chance actually does come up, so if you are ever in New England give me a shout. On my other antique vehicles I've actually had people stop in when they were visiting in the states from Australia, and the West Cost of the US.
On to progress yesterday and today I actually started welding in the panels and supports, up until now it has been a lot fitting and lots of Cleco Pins and Clamps. Today I welded in the middle body support which ties the center door post back into the cars floor pan and has the mounting bolt to bolt the body through rubber donuts to the frame. Once the body mount end was but welded to the Hat Channel under the floor a couple of zaps with the pinch spot welder and it was tied to the inner panel of the rocker structure.
Here are the three layers of the assembly going in with Cleco Pins.
The last picture is of course putting alignment jig in place again to check positioning for the next round of welding in the morning.
Now that I've got the process worked out I think the speed of progress will pick up.
Cheers Phil
Philip Waterman, New Hampshire
Cosmopolitan Town Sedan - Being restored1949 Lincoln web page
My Restoration Web Page
Cosmopolitan Town Sedan - Being restored1949 Lincoln web page
My Restoration Web Page
-
Steve K

- Lincoln-ally Insane
- Posts: 2868
- Joined: Fri Apr 30, 2010 7:12 pm
- Location: San Antonio, Texas
- Contact:
Re: Rip Van Winkle Lincoln
I am just in awe of you and people like you that have the skills and tools to do this. You not only inspire others, but you are saving beautiful and important pieces of American automotive history one pinch weld at a time!
2018 Lincoln Continental
1964 Lincoln Continental Sedan
1948 Mercury Town Sedan,
1959 Mercury Montclair
1964 Lincoln Continental Sedan
1948 Mercury Town Sedan,
1959 Mercury Montclair
-
ReijerLincoln
- Lincoln-ally Insane
- Posts: 4939
- Joined: Thu Jan 06, 2005 7:15 am
- Location: The Netherlands
- Contact:
Re: Rip Van Winkle Lincoln
Good stuff! Fun to watch (and do I assume).
-
CMP-Phil
- Lincoln Maniac
- Posts: 363
- Joined: Mon Dec 03, 2012 4:44 pm
- Location: New Hampshire, USA
- Contact:
Re: Rip Van Winkle Lincoln
Hi All
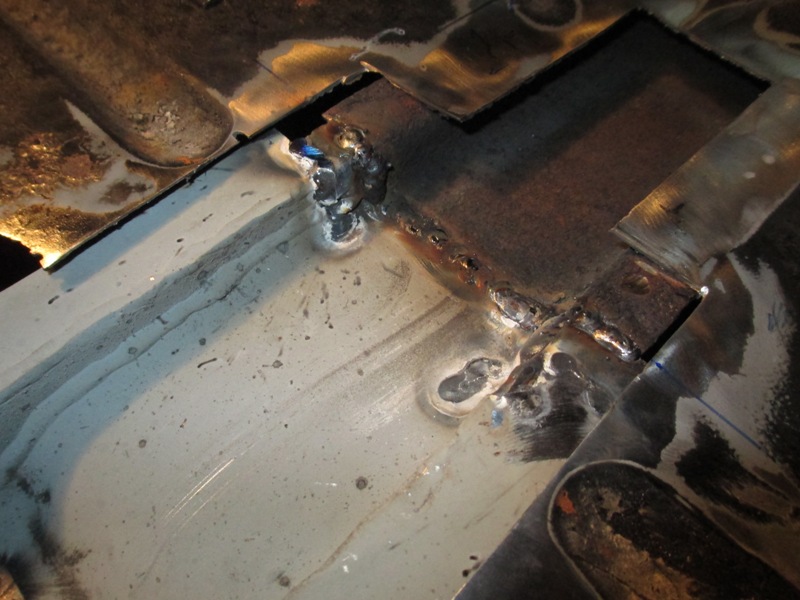
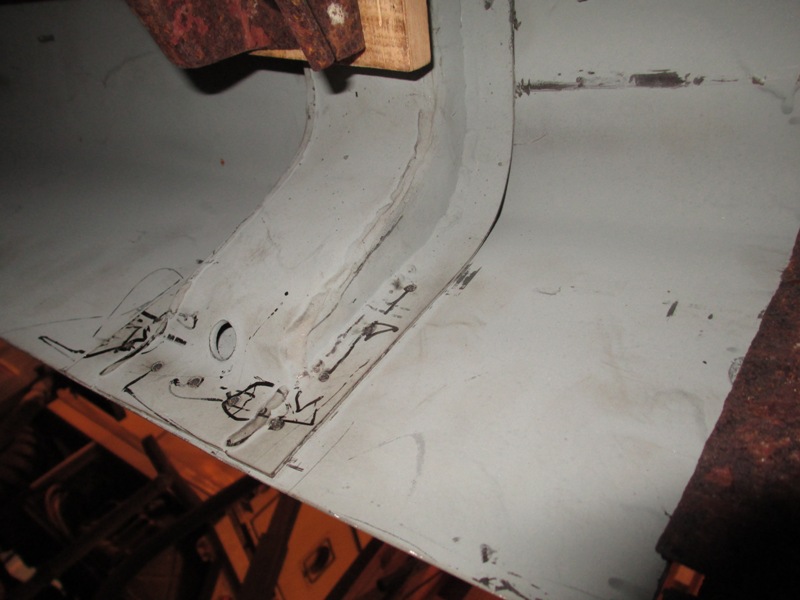
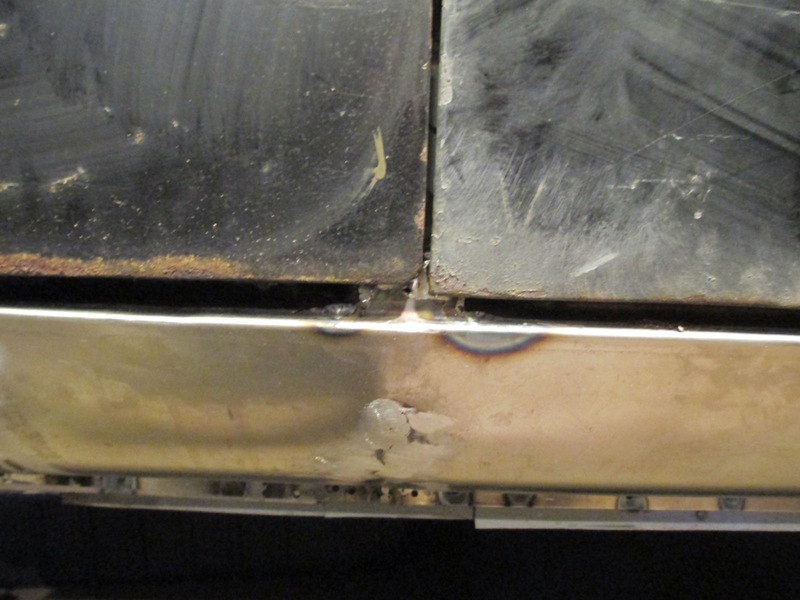
Little more progress this week, finished welding in the front most body mount and the internal structure of the rocker panel assembly. Amazing solid the floor and threshold feel and sound now that it is all welded back together.
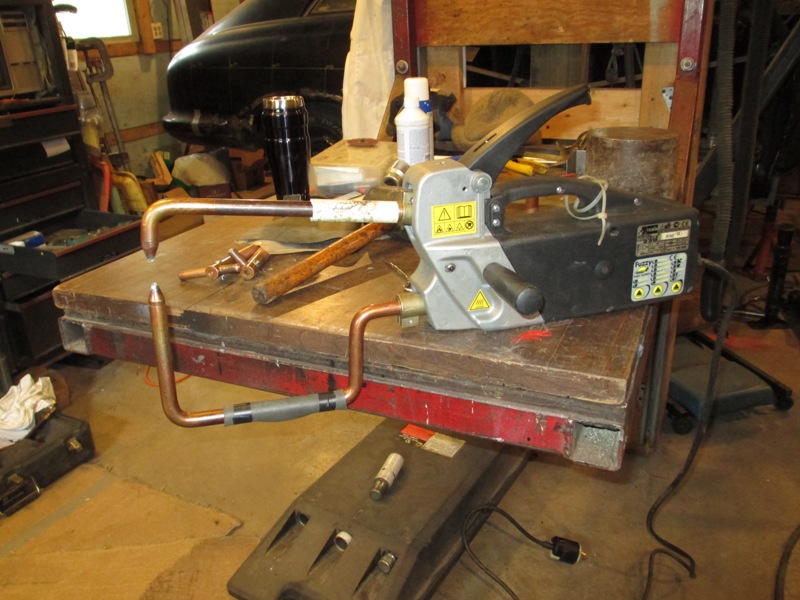
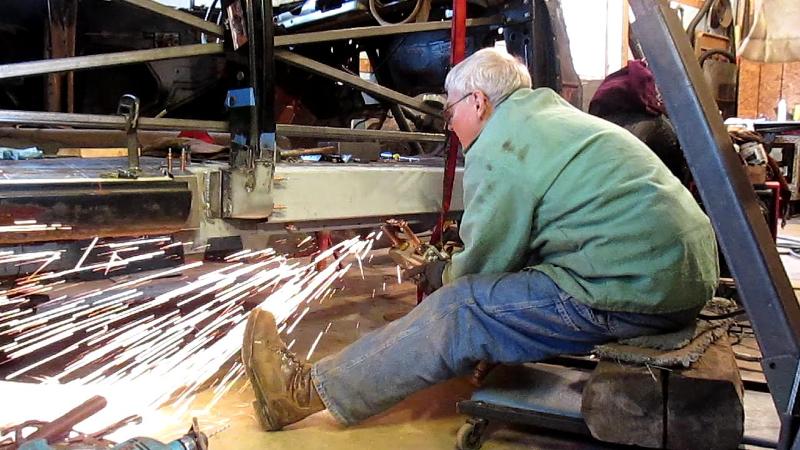
You can really see why they spot weld panels together on cars, it is so fast and there is so little warp age because the heat is so localized takes more time to put the right tongs on the welder and get it positioned than it takes to weld. The red strap hanging down in the middle of the picture is to take the weight of the spot welder to make it easier to position.
Now on to the rear section of the panel and the rear door post. I've posted a more photos and text
Cheers Phil
Little more progress this week, finished welding in the front most body mount and the internal structure of the rocker panel assembly. Amazing solid the floor and threshold feel and sound now that it is all welded back together.
You can really see why they spot weld panels together on cars, it is so fast and there is so little warp age because the heat is so localized takes more time to put the right tongs on the welder and get it positioned than it takes to weld. The red strap hanging down in the middle of the picture is to take the weight of the spot welder to make it easier to position.
Now on to the rear section of the panel and the rear door post. I've posted a more photos and text
Cheers Phil
Philip Waterman, New Hampshire
Cosmopolitan Town Sedan - Being restored1949 Lincoln web page
My Restoration Web Page
Cosmopolitan Town Sedan - Being restored1949 Lincoln web page
My Restoration Web Page
-
CMP-Phil
- Lincoln Maniac
- Posts: 363
- Joined: Mon Dec 03, 2012 4:44 pm
- Location: New Hampshire, USA
- Contact:
Re: Rip Van Winkle Lincoln
Hi All
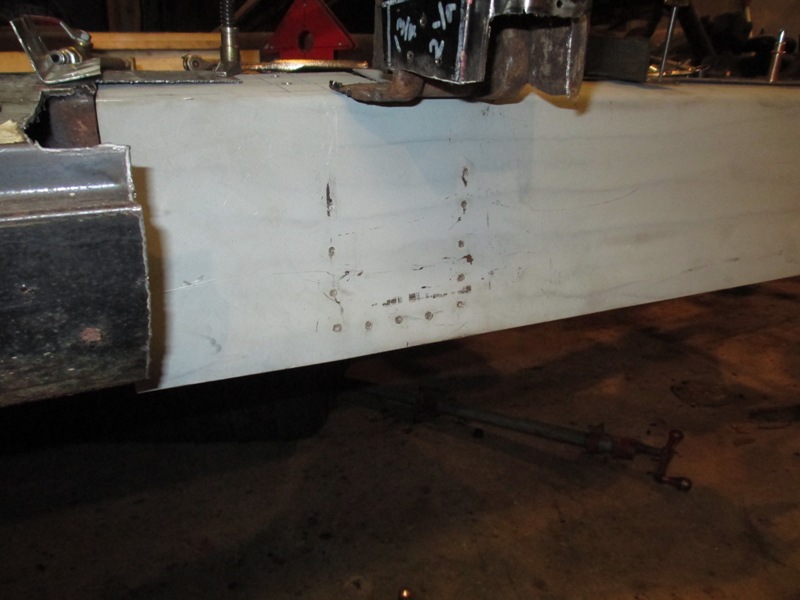
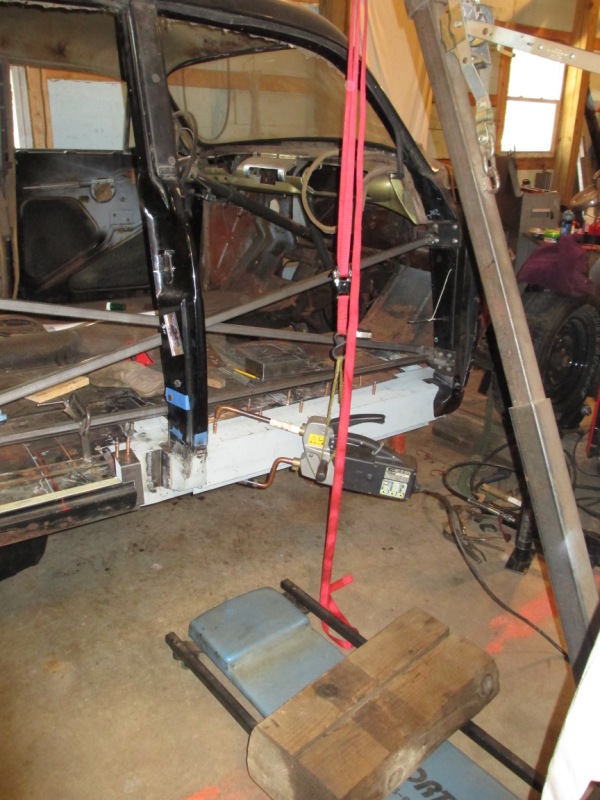
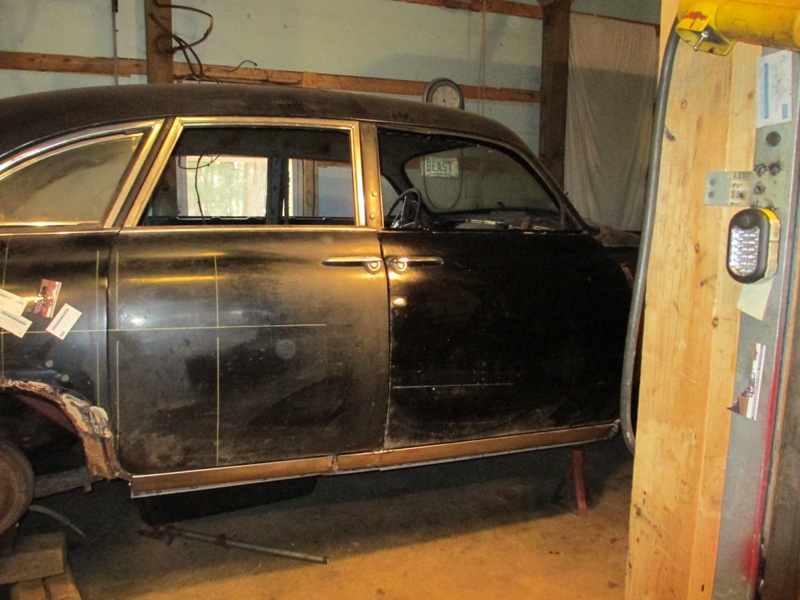
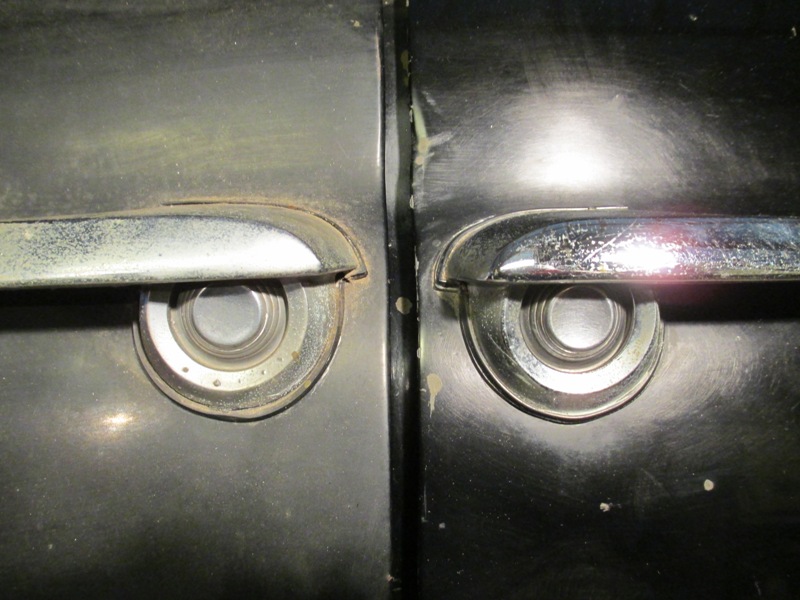
The progress continues, the passenger side rocker panel, and body mount support replacement is now complete. I removed the X-bracing and installed the front door, and it is dead on closes with a nice solid thunk. If you notice a difference in the shininess of the front door just a little more cleaning and wax brought the shine back. The Right Front Door is the only one with a damage a slight crease and small dent.
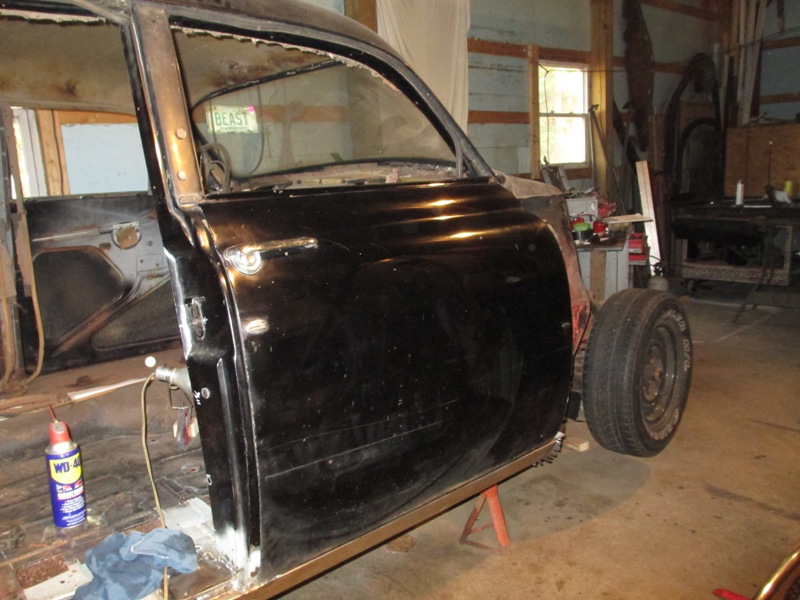
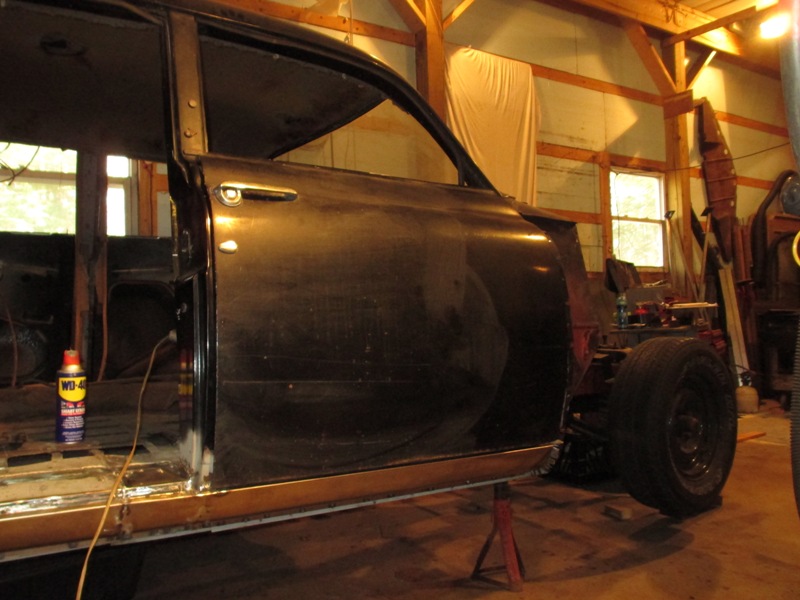
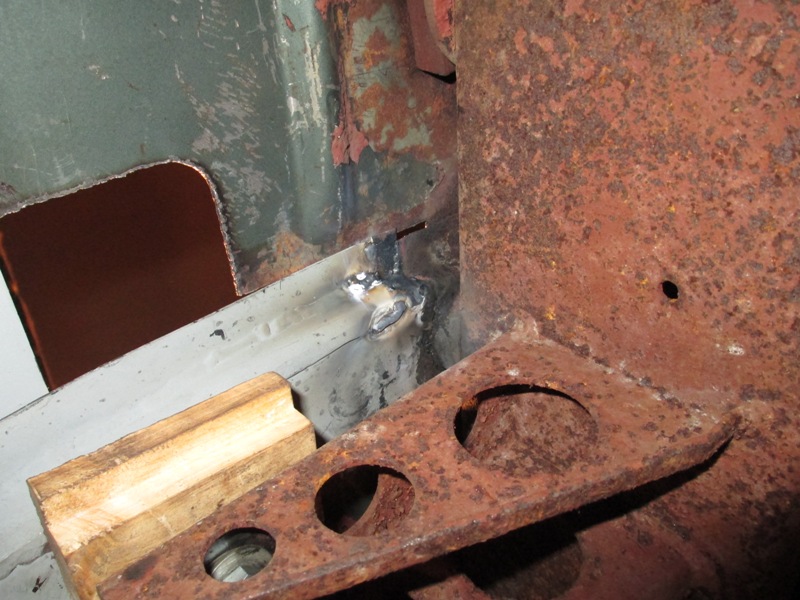
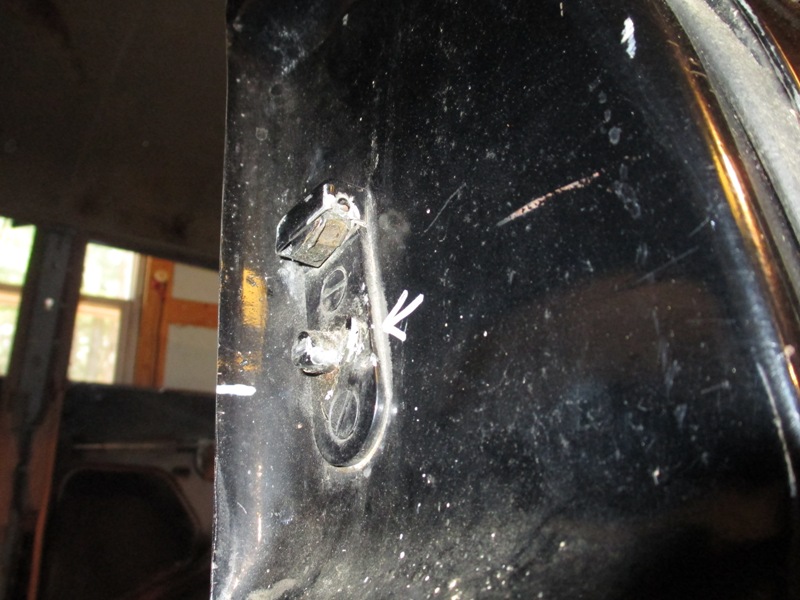
Then installed the rear door in it is 1/8th inch at door post, at first I figured that I had lost alignment of the hinge point during all my work, which considering I basically replace the entire structure inward from the edge of the rocker panel 12" deep into the car would not be surprising. But when I started looking closer at the door strike it has more wear than any of the other 3 so maybe this is in part of the problem. When I looked at the lower hinge mount I discovered that the inside weld is broken. There are indications that the driver side door at some point open while the car was in motion and been slammed hard against the stop. Finding this weld broken makes me believe that both door have had this treatment.
Now if I was an experienced body man I'd know just what to do to get the door back in alignment, but lacking that I've got stop and think about this, the first step will be doing a full sized CAD drawing of the door and door opening so I can see the results of adjustments on the hinge. All of the normal adjustment in the door hinges is on the door side of the hinge and seems only seems to affect the in out position of the door.
Can it be done with hinge shims, or do I need to move the actual door post mounting point and by how much do I need to move it?
So if you know of any good descriptions of alignment please point me in their direction.
I've posted a more photos and text
Cheers Phil
The progress continues, the passenger side rocker panel, and body mount support replacement is now complete. I removed the X-bracing and installed the front door, and it is dead on closes with a nice solid thunk. If you notice a difference in the shininess of the front door just a little more cleaning and wax brought the shine back. The Right Front Door is the only one with a damage a slight crease and small dent.
Then installed the rear door in it is 1/8th inch at door post, at first I figured that I had lost alignment of the hinge point during all my work, which considering I basically replace the entire structure inward from the edge of the rocker panel 12" deep into the car would not be surprising. But when I started looking closer at the door strike it has more wear than any of the other 3 so maybe this is in part of the problem. When I looked at the lower hinge mount I discovered that the inside weld is broken. There are indications that the driver side door at some point open while the car was in motion and been slammed hard against the stop. Finding this weld broken makes me believe that both door have had this treatment.
Now if I was an experienced body man I'd know just what to do to get the door back in alignment, but lacking that I've got stop and think about this, the first step will be doing a full sized CAD drawing of the door and door opening so I can see the results of adjustments on the hinge. All of the normal adjustment in the door hinges is on the door side of the hinge and seems only seems to affect the in out position of the door.
Can it be done with hinge shims, or do I need to move the actual door post mounting point and by how much do I need to move it?
So if you know of any good descriptions of alignment please point me in their direction.
I've posted a more photos and text
Cheers Phil
Philip Waterman, New Hampshire
Cosmopolitan Town Sedan - Being restored1949 Lincoln web page
My Restoration Web Page
Cosmopolitan Town Sedan - Being restored1949 Lincoln web page
My Restoration Web Page
-
John Mc
- Lincoln-ally Insane
- Posts: 3497
- Joined: Thu Dec 21, 2000 1:01 am
- Location: Crystal Lake, IL USA
- Contact:
Re: Rip Van Winkle Lincoln
Oh, those shots are great, you are an inspiration I'm sure to many of us -like me. Love those '49 to '51 Cosmos. Soooo cool! 
John Mc - Lake Shore Region Director
‘48 Continental Cabriolet
‘77 Town Coupe Black Diamond
‘77 Town Coupe Glass Top
'06 Mark LT
‘14 MKZ
'15 Lincoln MKC
‘48 Continental Cabriolet
‘77 Town Coupe Black Diamond
‘77 Town Coupe Glass Top
'06 Mark LT
‘14 MKZ
'15 Lincoln MKC
-
CMP-Phil
- Lincoln Maniac
- Posts: 363
- Joined: Mon Dec 03, 2012 4:44 pm
- Location: New Hampshire, USA
- Contact:
Re: Rip Van Winkle Lincoln
Hi
Thanks guys for the comments.
Well I've been finishing up the replacing the floor on that side of the car as I pondered how to adjust the alignment. While I was welding in floor panels which I am doing to replace any rusted areas but also to perfect my welding skills of welding in patch panels without warping them, figure better to practice here than on the outer body panels.
As I was repositioning the lights so I could see the weld area better, I happened to look at the rear hinge area, I mentioned earlier that the inner welds of the hinge mount are broken. Well to day with the light at a different angle the outer edge of the door post didn't look right. Inserted a feeler gauge in the seem between the door post and the outer body of the car and discovered that the 4 spot welds directly along side the hinge mount area are also broken.
Just finished playing around with the geometry of the hinge points and the door latch on the CAD to see what had to move and by how much. Letting the CAD software do the geometry calculations it looks like the lower hinge has to move to the rear by 3/64ths of inch to move the strike point down 1/8th. Now the question how do I move the plain of the hinge mount back just that amount without changing anything else?
Cheers Phil
Philip Waterman, New Hampshire
Cosmopolitan Town Sedan - Being restored1949 Lincoln web page
My Restoration Web Page
Cosmopolitan Town Sedan - Being restored1949 Lincoln web page
My Restoration Web Page
Who is online
Users browsing this forum: No registered users and 2 guests